how to make gameboots
ok this is the tutorial on how to make your own gameboot.pmf (a.k.a. the little video that plays when you start a game)
i worked on getting this to a point where it was simple to do and i think i found it. the main difference you will see right off the bat is im not going to tell you you need 20,000 different
programs to do this, with my method you only need 3.
TMPGenc
umd tools (i cant give you this it is illegal but if you look hard anuff you will find it)
mps to pmf
now that you have the tools lets get started...
1.get your video, you can download in just about any format you want it dosn't matter.
2 open TMPGenc and start by selecting "set source" and add the video file you want to use.
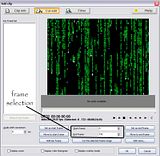
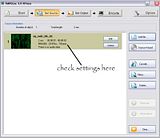
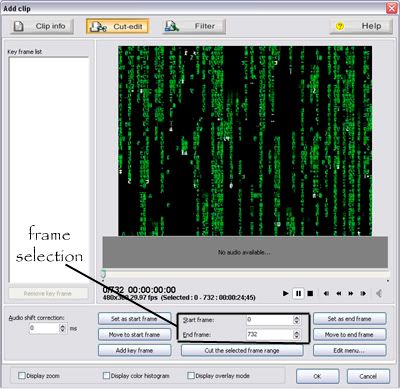
3. first clip info set the aspect ratio to 16:9 for the wide screen and 4:3 for a square none full screen view. next editing must be done on the video your game but can only have 72 frames at 29.97 fps so your gameboot will be about 2 and half seconds long any more and you will not see the end so choose your start frame at the point you want and the end frame as well. when you click ok it will show the clip info as well as the frame count so check there to make sure every thing is right.
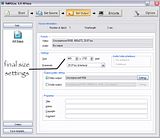
4. next set your out put to avi its the only format that will work in the up coming steps. make sure the size is set to 480x272.
5. ok now comes the encoding part you can preview and rename and direct the output for the new video you are making and than just click "start output"
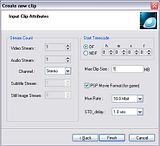
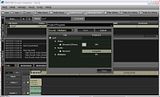
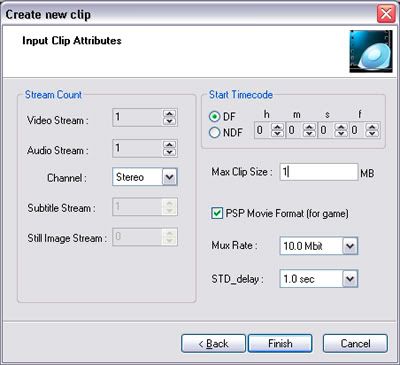
6. ok next step using the umd tools you will want to select "UMD stream composer" its buried in the folders its in side the bin i think. start a new clip and make sure your settings are "max clip size: 1mb" and click "psp movie format" if you dont do this it will not work.
7. now select video source from the menu bar and select the video clip you just made.(this step is not needed you dont have to have sound) select sound source also on the menu bar and pick a sound it should be a wav format and should be set to frequency 44100hz 16bit and be stereo.
8. ok now go to run and select "encode + multiplex" after a few munits it will finish and you will have made a .mps and are almost done.
9. now go to the "my documents" folder and open the "umdstreamcomposer" folder and than "mux work" than the folder named after the project you made the .mps in than open "00001" you will find your mpf here.
10. copy the mpf and move it to the "gameboot" folder in side the "mpstopmf" folder and run the app "Gameboot Converter.bat" it will make a new file named "00001.pmf" rename it to gameboot.pmf and put it in flash0:/vsh/resorce but save the origanl one first just incase. you are now done enjoy
ps here is one i just made during that tutorial download[/img]
(a quick note you can make the icon1.pmf for psx gameboots this way as well just set the output size in step 4 as 144x80)
here is a test is did
i worked on getting this to a point where it was simple to do and i think i found it. the main difference you will see right off the bat is im not going to tell you you need 20,000 different
programs to do this, with my method you only need 3.
TMPGenc
umd tools (i cant give you this it is illegal but if you look hard anuff you will find it)
mps to pmf
now that you have the tools lets get started...
1.get your video, you can download in just about any format you want it dosn't matter.
2 open TMPGenc and start by selecting "set source" and add the video file you want to use.
3. first clip info set the aspect ratio to 16:9 for the wide screen and 4:3 for a square none full screen view. next editing must be done on the video your game but can only have 72 frames at 29.97 fps so your gameboot will be about 2 and half seconds long any more and you will not see the end so choose your start frame at the point you want and the end frame as well. when you click ok it will show the clip info as well as the frame count so check there to make sure every thing is right.

4. next set your out put to avi its the only format that will work in the up coming steps. make sure the size is set to 480x272.
5. ok now comes the encoding part you can preview and rename and direct the output for the new video you are making and than just click "start output"
6. ok next step using the umd tools you will want to select "UMD stream composer" its buried in the folders its in side the bin i think. start a new clip and make sure your settings are "max clip size: 1mb" and click "psp movie format" if you dont do this it will not work.
7. now select video source from the menu bar and select the video clip you just made.(this step is not needed you dont have to have sound) select sound source also on the menu bar and pick a sound it should be a wav format and should be set to frequency 44100hz 16bit and be stereo.
8. ok now go to run and select "encode + multiplex" after a few munits it will finish and you will have made a .mps and are almost done.

9. now go to the "my documents" folder and open the "umdstreamcomposer" folder and than "mux work" than the folder named after the project you made the .mps in than open "00001" you will find your mpf here.
10. copy the mpf and move it to the "gameboot" folder in side the "mpstopmf" folder and run the app "Gameboot Converter.bat" it will make a new file named "00001.pmf" rename it to gameboot.pmf and put it in flash0:/vsh/resorce but save the origanl one first just incase. you are now done enjoy
ps here is one i just made during that tutorial download[/img]
(a quick note you can make the icon1.pmf for psx gameboots this way as well just set the output size in step 4 as 144x80)
here is a test is did